30
years
30
years
Your regular update of news and articles from the world of DISC personality profiling with the Discus solution.

Published: Tuesday 5 March 2024
The Discus Results List is your your main control centre for managing the candidates on your Discus database. If you've created even a single Discus profile, the Results List will appear as soon as you sign in, and you can also display it at any time by clicking the 'Results' tab.
The basic operation of the list is straightforward and intuitive: click a candidate's name in the main list, and you'll see a summary of their profile and a menu of options. Click 'View' in that menu to see their report, or use the other options to e-mail a report, create a Job Match, or choose any other option you need.
Beyond simply selecting and viewing candidate results, though, the Results List gives you a host of extra features to help you manage and organise your results. Here we take a look at those extra features and see how they can help you get the most out of your Discus candidate database.
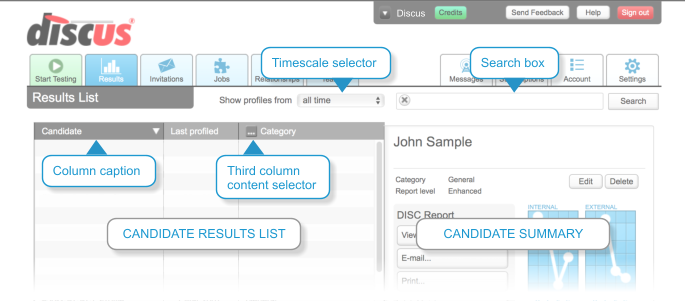
Discus will show you all your results in a single list, but if you have a very large number of candidates, it's often more efficient to limit this to more recent profiles. You can do this easily with the timescale selector, the option labelled 'Show profiles from...' above the list. If you set this to 'all time' you'll see every candidate you have ever profiled in the list. If you change the setting to 'last 12 months' or even 'last 30 days', you can tell Discus to temporarily ignore older profiles.
Changing this setting will not affect your actual data, of course; it just limits what's shown in the list. If you need to review older profiles, you can easily include them once again by setting the timescale back to 'all time'.
Finding individual candidates is a lot easier if you use the 'Search' box. Enter a candidate's name, or part of their name, and click 'Search' to limit the Results List to just show candidates whose names match the text you entered. When you want to clear the search and return to the full list, just click the 'clear' button (the small cross) inside the Search box to cancel your search filter.
The Results List is divided into three columns - the candidate's name, the date of their profile, and third custom column that you can set to your own preference. You'll notice that one of those columns has a heading in a darker colour than the others, and shows an arrow symbol next to its caption. That highlight indicates that Discus is currently sorting your list by this column. If you haven't changed the settings yourself, this will be the 'Last profiled' date column, set to show your most recent profiles at the top of the list.
You can choose to sort the list using any of the columns, just by clicking the column caption. For example, click the 'Candidate' caption and the list will switch to highlight that column and show your candidates listed alphabetically. Click the same column heading again to reverse the search order (so in this case, if you click 'Candidate' again, your candidates will be shown in reverse alphabetical order). The arrow next to the highlighted caption shows the direction in which the list is currently sorted.
The third column of the Results List is a custom column, meaning that you can choose the information it presents to suit your particular needs. Click the content selector next to the caption (the small button marked '...') to choose from a range of display options:
Shows you the report level currently available for the candidate, and thus the level of assessment detail available.
Shows you the candidate's category (you can enter this category when you set up an invitation or display a questionnaire).
Shows an abbreviated summary of the candidate's DISC style (e.g. D/I for high Dominance and low Influence).
Shows the candidate's e-mail address, if known. You can click this address to contact the candidate directly.
The custom column comes into its own in combination with the list sorting feature. For example, if you want to find all the candidates in a particular category, switch the custom column to 'Category' and then click its heading to sort your candidates into their categories. You can even use this approach to find particular profile types by switching to 'DISC Pattern' and applying a sort.